Saturday 21 December 2013

We LOVE Weekend Box Club!

I am so excited about the Weekend Box Club that I am taking to my blog to let my readers know about this amazing idea.  I haven't been paid or even received a free box for this post, I am writing it because I am genuinely bursting with enthusiasm about how good the boxes are.  I should know as I have ordered around 6 in total, and with each box I have tried my hardest to look for flaws.  I looked for ways I could do the activities for a cheaper price, and the fact is I couldn't. I am more than happy with the £7.50 per box as we have such fun with each box.  And it's not just fun but educational too...


I'm full of good intentions, I have lots of children's craft books dotted around the house and an extensive craft box for them should we need coloured pompoms, googly eyes or even rainbow coloured pipe-cleaners.  But the fact is whenever I open a craft book there is often something else we are missing or simply by the time we have located all the items, they are bored with the idea of the craft.  That's what's so brilliant about the Weekend Box Club - apart from a few store-cupboard ingredients (which are mentioned to you through email when the box is dispatched so you can be prepared) everything is right there for you to instantly do with your child.

In each pack you get four activity cards; something to make, something to cook, something to read or write and something green.  Every activity is inspiring and thought provoking.

There's another aspect to this; as a parent it can be daunting trying new recipes with children but the way in which the cards are written makes each idea seem much more child-friendly and approachable.


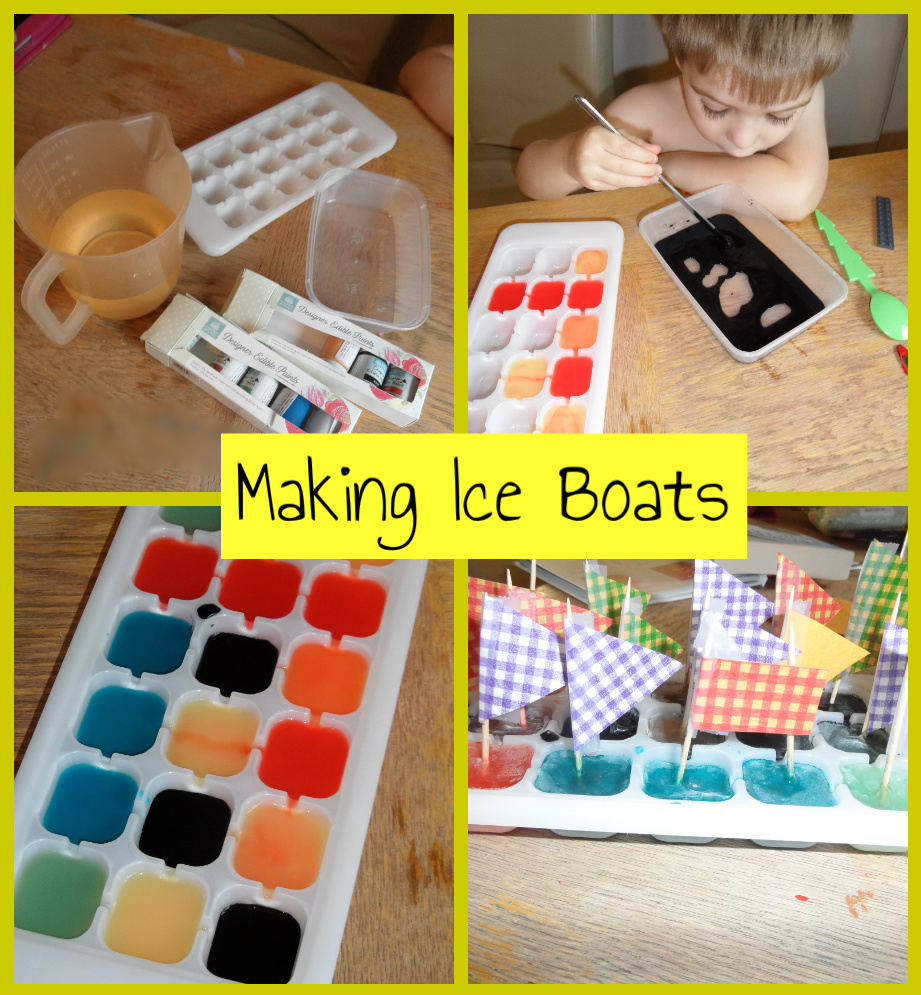
So at the moment Christmas is just round the corner and it's just one of those occasions where everywhere you look there are beautiful pictures of children settled in front of a cosy fire making homemade Christmas cards and eating homemade mince pies.  This idealistic imagery is usually unachievable for me, but now with the bite-size chunks of crafts and creativity that Weekend Box Club provides I have had many days of topical fun that has made memories for us as a family.  They say a photo tells a thousand words, so here's the evidence....


I love the fact that activities are seasonally topical - making each and every month of the year magical!


This was my favourite photo as the Weekend Box even interested my 11 year to take part with the cooking activities.  


So a big thanks to Weekend Box Club for making magical memories for my children....

If you would like to find out more information then please visit https://www.weekendboxclub.com/


Monday 11 November 2013

Filofax Blogger Challenge

Over a cold, wet and windy half-term we were given a blogger challenge by Filofax.  This challenge was to complete a diary with all the activities we took part in over half -term.  My little one is only four years old so the idea of keeping a diary was a relatively new idea for him, but he enjoyed the process.  He enjoyed the daily task of remembering and putting on to paper what he had partook in that day.  


We hope you enjoyed reading our half-term diary!  For more information please visit http://www.filofax.co.uk

Charity organiser supporting Springboard for Children, who work to raise the literacy of children in the UK who are left behind in the education system. Containing special content to help develop children's literacy. A charity organiser supporting Springboard for Children, who work to raise the literacy of children in the UK who are left behind in the education system.

Full of inspiring ideas to make reading, writing, spelling and language development fun and rewarding. For each organiser sold Filofax will donate £1.50, which goes directly to Springboard’s life-changing work with children who need their support.
Disclosure: We were given a free Filofax and pencils to partake in the challenge.

Saturday 2 November 2013

Foodimals competition


'Cloudy with A Chance of Meatballs' is one of our favourite films and so we are really looking forward to seeing the sequel 'Cloudy with A Chance of Meatballs 2'.  In fact the Vue website is currently running a brilliant competition! To enter you have to create your own Foodimal.
We got the idea for our 'Foodimal' when my son was playing with his Plasticine and said he wanted to create a 'smelly pig'.  We had a watermelon in the house, so I thought we could create a 's'melon'y pig.  So we are going to call our creation Sid the smelly pig.  His hobbies would include rolling in mud and eating a lot, hence why his belly is so full!


I won't lie carving a watermelon is no easy task, it's 100 times more messy than carving a pumpkin as there is so much sticky water from a watermelon to deal with.

We actually found the idea on how to create a watermelon pig from the Annabel Karmel website.

This is how we made him:
1: Cut off lid.
2. Scooped out innards with a melon baller.
3. Cut ears and a nose from the lid.
4.  Cut out a tail on the back of the watermelon.
5. Added glace cherries and raisins on cocktails sticks for the eyes.
6.  Added bits of lime on cocktail sticks for the feet.
7.  Filled the inside with the melon balls.
Delicious!


If you would like to enter the competition, here's the link http://www.myvue.com/film-news/article/title/bloggers-competition-win-tickets-to-cloudy-with-a-chance-of-meatballs

Saturday 21 September 2013

Debenhams Dream Bedroom competition


Task: Debenhams are running a fantastic competition at the moment where you have to blog about your dream bedroom.  Although, with Debenhams' stunning homeware the only problem was I was spoilt for choice.  

How I chose: When considering what bedroom items to buy I always think of one thing; cosiness!  Yes, I love my bedroom to feel warm and cosy.  I want it to feel full of life and yet not in the least bit cluttered.  That's why I love the combo of the colour red and the mirrored glass; the two intertwine to create warmth and a feeling of space.  And so with that in mind I went about choosing my products for my dream room.......


My choices from L-R
  •  Debenhams wooden two-tone photo frame £15
  • John Rocha red tapered stand lamp £65
  • Jeff Banks Home Sierra red lined eyelet curtains £95.99
  • Litecraft Madonna 5-Light Red and Black crystal chandelier £239.20
  • Laurence Llewellyn-Bowen red manor house wallpaper £12.50 a roll ( I would require 3 rolls)
  • Debenhams red 'Carousel' swivel chair £384
  • Colony Honeysuckle reed and oil diffuser £11
  • Debenhams red 'Mahdia' bed linen £80
  • Queens fine china red 'Penzance Crush' mug £6.00

Reasons for my choices: I'm really pleased with my choices.  I feel as if I have successfully combined luxury and glamour with comfort.  The wallpaper, chandelier, mirrored wardrobes and faux fur throws contribute to the luxury feel.  Whilst the plain red of the duvet cover, curtains and lamp make the bedroom look easy on the eye and not too busy.


The oak items and brown rugs and throws add in a earthy feel to the room which makes it feel very relaxing. 

Items:
  • Star by Julien Macdonald silver hinged dressing table mirror £40
  • Debenhams chocolate faux fur throw £30
  • Debenhams oak mitre dressing table and stool set - on sale at £504
  • Debenhams brown whisper rug £100

  • Oak mitre three drawer dresser- now on sale at £328
  • Debenhams mirrored Solar 4 door wardrobe - on sale at £720
Final touches: Of course I couldn't be without my final touches either; which are the reed diffuser, photo frames, dressing table and special mug for drinking tea in my lovely bedroom.

Overall spend: £2,649.69


Can dreams come true? I can already picture myself in this room, enjoying cuddles with the children and watching films in bed with my husband.  Debenhams thank you for the enjoyable task of asking bloggers to create their dream room.....

If you would like to enter the competition visit http://blog.debenhams.com/debenhams-dream-bedroom-competition/get-involved/competitions/ for more details.


Friday 6 September 2013

Review: Mad Hatter Costume from Joke.co.uk


We were recently invited to review any costume up to the value of £15 from the Jokers Masquerade website.  At first I thought this might be a difficult task, as I usually expect to pay around £20 upwards for a decent costume.  But I was pleasantly surprised at the variety available for a lower price.

After much deliberation I chose a Mad Hatter costume, being a big fan of Alice in Wonderland I saw lots of potential for this costume.  The first one springing to mind is the World Book Days at schools, where children have to wear a costume relating to a character from a book.  But secondly I imagined this costume being great for photo opportunities as the colours in the costume are so vibrant.  I intend getting a big colourful tea set as a prop for this costume, oh and maybe a large set of cards.  The possibilities really are endless......

The costume consists of a jacket with attached waistcoat, shirt and tie and a top hat.  I like the fact that by not including trousers (as any pair of trousers or shorts you own will work with this) they have been able to keep the price of the costume down.

When I buy a costume there are three things I want to know about; that is qualityprice and fit!

The quality of this costume was fantastic, I've included a few photos of the stitching which is all well presented and the materials were all really comfortable against my son's skin.  There were no issues with scratchy labels or the like.


At £11.99 this costume is excellent value for money.  The costume was aged at 5-7 and was a little too big for my son (aged 4) but it was just a case of rolling the sleeves back; which makes the costume very versatile for different ages.

If I could make any improvement to this costume it would maybe be to add an accompanying teapot or tea-set to reiterate the eccentricity of the character.


So when I realise that Halloween is fast approaching I know that Joke.co.uk will be my first choice for costumes.  Very pleased!

Disclosure:  
  • I received a free costume from Joke.co.uk in exchange for writing a review on the blog.  All reviews are my honest opinions.

Sunday 25 August 2013

Make a sail boat: Center Parcs' August Challenge

Every month Center Parcs sets a new challenge for bloggers to partake in with their families.  It's really great because it gives me direction for new things to try out with my children.  This month the challenge was to construct and decorate your own sail boat

With my newly founded love of Pinterest, I browsed until I found some fun sailing projects we could do and our crafty day began.  Bearing in mind that my four year old son had fallen down the stairs the day before and had twisted his ankle this gave us a good opportunity for some new bathtime fun ideas rather than being able to go to the local pond to test out our ideas (which would have been lovely).

First up, we made a very special kind of boat; an ice boat!


This was a brilliant project as it allowed for lots of sensory play activities.  All that is needed for this project is:

  • some cocktail  sticks
  • an ice cube tray
  • food colourings 
  • tape
  • water
  • paper cut in to shapes for the flags.
My son loved mixing in the food colouring; whirling and swirling until the water turned a vibrant orange or mysterious midnight black.  It was also a chance for him to see what happened when certain colours mixed together and if we gently overfilled one ice-cube block then we got a delicate twirl of colour in the middle of the next ice-cube block.  The effect reminded us of planets in the galaxy.

The most challenging part of this project was to get the cocktail sticks to remain upright.  After an hour if the water has solidified you can insert your cocktail sticks, if they tip over at first just keep checking every 15 minutes until you have propped all of the sticks in the centre.  When they have solidified totally they are ready for action, and all that remains to be done is taping on the little flags (which does need to be done with relative speed before the ice-cubes melt.)


This activity is a good way to teach children the properties of ice and water.  It's also great fun for them to see all the colours merge at the end; we ended up with one murky blue bath! Great fun!

But our fun didn't end there!  We also made some paper boats (well I did, the origami was too complicated for a four year old. But he did enjoy decorating them.)  And also a lollypop stick raft.


The lollypop raft is really easy to make for kids.  They just have to glue lots of lollypop sticks together and stick in a cocktail stick with flag in the middle and leave to dry.  It worked perfectly. and because we used pre-coloured lollypop sticks we also got some lovely colours merging in to the water.  

The paper boats I made with instructions from Wikihow.  It was so much easier being able to follow these visual instructions.  As you can see from the above photos, they all went down a big success.

To finish off the day, my husband bought our little boy some new water toys and we done some sail boat rubber stamping and made a lovely paper boat picture!  What a fun day we had completing these activities!


This post is an entry in the Centre Parcs August challenge with Tots 100 

Wednesday 13 March 2013

Kidz Labs Volcano Making Kit from Craft4kids.co.uk


It's Science Week between the 15th and 24th of March and Crafts4kids.co.uk have a wonderful selection of kits to make science fun for kids!  Have a look for yourself here http://www.crafts4kids.co.uk/science-kits/c42


We were sent the brilliant Kidz Labs Volcano Making Kit and it was fascinating to make.  It's a rare opportunity when I get to drag my 10 year old son away from his Xbox, but if you have something like this kit to hand then with a few simple ingredients it doesn't take long to get to the nitty gritty that kids love!  

The instructions that come with the kit were very clear and detailed, so each step of making the volcano was made very easy.   The moulding and painting aspect of the kit is great to involve any children who love to get creative.

We've made a video to show how we got along with the kit:


And thereby we learn the destruction a simple chemical reaction can make!


So what did Master Craftiness learn?
  • Master Craftiness learnt that the volcano erupting was actually a chemical reaction. This means that one substance (the vinegar) changes when the other substance (the bicarbonate of soda) is added to it.
  • Vinegar is an ACID which REACTS with the bicarbonate of soda and GAS fizzes out, making it look like the volcano is erupting.
  • A real volcano forms when MAGMA (hot liquid rock) collects in a chamber deep underground. As more and more magma flows in to the chamber, pressure gradually builds up until the magma is forced upwards through a narrow tube called a VENT. Then, like a shaken lemonade bottle, the ash, magma and burning gas burst through an opening in the surface of the Earth, creating a VOLCANIC ERUPTION.
  • When the magma comes out of the ground it is called LAVA.
  • LAVA is composed of liquid rock which flows out of the volcano.
  • LAVA can travel very quickly or so slowly you can hardly see it moving.
  • A lava flow burns everything in its path, until eventually it cools down again and turns in to solid rock.
  • The cooled fragments are called TEPHRA which fall back to Earth, covering everything in ash.

Things I have learnt:
  • To put a peg on my nose when dealing with this much vinegar.
  • The Stromboli volcano in Italy has been erupting for the past 2,400 years.
  • The largest volcano in the solar system is Olympus Mons on Mars.
  • There are about 1,500 active volcanoes in the world, so as you're reading this there's probably a volcano erupting somewhere.

Our opinion: This was a great little kit to illustrate how much fun science can be and we both learnt some interesting facts about volcanoes.

Wednesday 20 February 2013

My Tots100 Printerpix competition entry


Tots100 and Printerpix currently have a wonderful competition running with the top prize being a Panasonic Lumix DMC-FZ200 camera and £100 to spend with Printerpix.  There are four runners up prizes of a large framed photo or canvas print.  To enter you just need to submit your favourite family photo.  It ends on the 22nd of February and is open to all registered Tots100 members.  You can find out more about the competition here

I hope I am entering my photo in the right category.  The categories are as follows:
  • Babies Under 2
  • Children aged 2-4
  • Children aged 5+
  • Family Portraits


I think I will opt for the 'Children aged 5+' category as I don't feel my photo fits the 'Family portraits' section as I would expect more people in the photo.  My boys are 4 and 10 years old, so I will go with entering this photo in the 'Children aged 5+.'


This photo is my favourite as it's my two son's venturing out on a long autumn walk together, nicely kitted up for the cold weather we were experiencing.  My husband and I walked behind them and it was a proud feeling seeing our children enjoy the magic of long walks in the forest.

To me this photo sums up everything about my hopes and dreams for them.  I hope they will always be united and always be there for each other on the long road ahead.  I hope they will always find the magic and beauty in nature and appreciate the pleasure it can bring.  More than anything I hope they will not only be brothers, but true friends.


This post is Sarah's entry into the Printerpix photo competition.

Sunday 17 February 2013

Tots100 MoneySupermarket That’s My Hero competition


This post is an entry into the Tots 100 Moneysupermarket That's My Hero competition!  

Moneysupermarket's new TV advert is all about Alan, who jets off into space and becomes his son's hero, so this month Tots100 and Moneysupermarket have launched a competition to write a blog post about your child's hero.

I asked my four year old and his answer this week was 'a big scary monster'; asked why his response was "because they are big and scary and can frighten people; and can get rid of baddies."

Here's his drawing:
 Isn't it funny what children can deem as a hero?

If you would like to enter the competition, please head here

Flippin' good fun!


Dear Confused.com,

Thank you for your interesting post on pancakes.  I was intrigued to find out that by cooking pancakes I am actually moneysaving:

 Meal TimeEnergy Used Cost *
 Oven cooked dinner 60 mins 1.2kw/h 17p 
 Microwave meal 10 mins .75 kw/h 2p
 Pancake on the hob 2 mins 1.2kw/h 1p


Read more: http://www.confused.com/gas-electricity/articles/pancake-challenge-competition#ixzz2KzBjVqsi


But did you also know that you can even make pancakes in a slow cooker?  Admittedly, it will be a big giant one, but you can cut it up and we all know how economical a slow cooker is!  It will even save you the worry of burning the pancakes or any 'flipping' disasters!  What's even easier is that you can do your measuring using a cup. If you don't like using rough measurements, a cup is equal to roughly 240ml.  Here's a link to a great recipe

Anyway, lots of fun was had making creative pancakes this Pancake Day.  Here's what we made:


 Pancake Day is never complete to me without a bottle of golden syrup and lots of fresh fruit.  
Firstly we created a giant sun pancake.  Simply made by making a plain pancake, using bananas for the eyes and a blueberry for the nose and chocolate sauce for the mouth and eyebrows.  The rays were made by alternating laying strawberries upside/downside.  It was great fun for my son to see a plain pancake turn in to something that looked quite comical. This pancake also didn't require much cooking skill, so it's a great project for children to help out with.
 The sun pancake was a big hit and everyone enjoyed eating him.  He was so big he required a punnet of strawberries to complete his rays of sunshine.

Being huge Toy Story fans, our next pancake was Mr Potato Head.  Again, this just required me to make a plain pancake and the decorating could be done in the main part by my four year old. 


 The following pancakes were ideas taken from the book 'OMG pancakes' by Jim Belosic and they were surprisingly easy to do.  They just required the use of a squirty bottle; you then had to draw the various shapes on the pan.  My son thought the creations were wonderful.  I have never seen him eat pancakes so quickly.

Elephant


 Dog

 Noughts and crosses.


The spaghetti was made by drizzling the plain batter around the pan and the meatballs were formed by making circles on the pan with pink batter.

 This one just required the addition of food colourings.  The eggs were made in two parts.

 This unicorn was made by drawing on the pan with various coloured batters and the addition of fruit and choc chips.

The children loved the creations and showed much more interest in them than the plain old pancakes we normally have each year.

Thank you Confused.com for the fun challenge!  If any of my readers would like to take part in the challenge you have until February the 28th to do so.  You can read more about the challenge here

Friday 15 February 2013

Ready, steady, FLIP with Center Parcs’ February Pancake Day challenge!

Center Parcs is one of my favourite places in the world.  We have made so many magical memories as a family there that it is somewhere I hold dear in my heart.  When I think of Center Parcs I think of fresh air, forest walks, being at one with nature, beautiful scenery and quality time with the family.  So I was rather excited to be able to take part in their bloggers challenge for this month; which was to get creative with pancakes.

We always love to get creative when we go to Center Parcs; The Pottery Painting Studio being one of our favourite places.


I particularly love the above photos of our time at Center Parcs and so when I first ventured in to creating some novelty pancakes on Pancake Day, it was this photo I had in my mind to recreate.  This is what I created:

 It's certainly not what I had in my mind, but as far as making a picture with pancakes, I was pretty pleased with my first attempt. This was just made by using various squirty bottles filled with different coloured batter. I achieved the colours by mixing food colouring to the batter.  The picture is meant to represent my husband and son walking through the forest at Center Parcs.  To emphasise the magic we feel at Center Parcs, I thought I would add on a bit of edible glitter.  Unfortunately I was a bit too heavy-handed and half the pot fell out, so it looks more like a fireworks event at Center Parcs now.


 I don't think the pancake looks particularly appetising and I didn't really fancy serving it up to anyone due to the large amount of edible glitter on it.  If I was to remake the pancake I would probably add in peppermint essence to the tree and maybe a strawberry flavouring to the red colouring.  But this was my first attempt and it inspired me to carry on being creative throughout the day.


Here are some of the other pancakes I thoroughly enjoyed making.  My four year old enjoyed helping with the decorating too (using strawberries, choc chips, blueberries and bananas).

Pancake Day is never complete to me without a bottle of golden syrup and lots of fresh fruit.  
Firstly we created a giant sun pancake.  Simply made by making a plain pancake, using bananas for the eyes and a blueberry for the nose and chocolate sauce for the mouth and eyebrows.  The rays were made by alternating laying strawberries upside/downside.  It was great fun for my son to see a plain pancake turn in to something that looked quite comical. This pancake also didn't require much cooking skill, so it's a great project for children to help out with.

The sun pancake was a big hit and everyone enjoyed eating him.  He was so big he required a punnet of strawberries to complete his rays of sunshine.

Being huge Toy Story fans, our next pancake was Mr Potato Head.  Again, this just required me to make a plain pancake and the decorating could be done in the main part by my four year old. 

 The following pancakes were ideas taken from the book 'OMG pancakes' by Jim Belosic and they were surprisingly easy to do.  They just required the use of a squirty bottle; you then had to draw the various shapes on the pan.  My son thought the creations were wonderful.  I have never seen him eat pancakes so quickly.

Elephant

Dog

 Noughts and crosses

This one just required the addition of food colourings.  The eggs were made in two parts.

The spaghetti was made by drizzling the plain batter around the pan and the meatballs were formed by making circles on the pan with pink batter.
 This unicorn was made by drawing on the pan with various coloured batters and the addition of fruit and choc chips.


The children loved the creations and showed much more interest in them than the plain old pancakes we normally have each year.

Thank you Center Parcs for the fun challenge!  If any of my readers would like to take part in the challenge you have until February the 22nd to do so.  You can read more about the challenge here.  I look forward to next months!